The Overview
In an independent study class for the “Physical Web”, I was tasked with making an Arduino interact with a webpage. For this project I chose to have a webpage with piano keys play tones through the Arduino speaker. The entire process was a great exercise in trial & error.
Context and Challenge
Over the course of 10 weeks, I worked with various examples in the Arduino Starter kit to familiarize myself with the Arduino code and board wiring process; the examples helped me establish a fundamental understanding or how these two facets work together.
One thing that the examples didn’t teach me was what to do when you want the Arduino to communicate with a webpage and vice-versa. For my Project wanted my Arduino to be controlled by mouse clicks on a webpage. I started with idea that was similar to one of the Arduino kit’s examples. In that example, the Arduino had four buttons that act as keys on a keyboard, and a little speaker; mine would have no buttons on the board.
The goal for this project was to create sounds on the Arduino’s little speaker when the keys on the webpage were pressed. The metrics of success on this project were: was the code valid; was the code on the server-side compatible with the Arduino; and most importantly does it work? This was a solo endeavor. However, towards the end, I sought help from my professor and my fellow students and who were working on similar projects.
Process and Insight
To execute this plan, I first started with creating a webpage with HTML, styling it with CSS. Once the page was created, I used the Javascript (JS) to create ‘mousedown’ and ‘mouseup’ functions that would recognize the container class of each piano key that was pressed sending the corresponding container name to a text file in a numerical representation. The JS was able to send this information because of another function, ‘js2php’, linking it to a PHP file that could call the text file.
The text file was able to send this number to a linked Processing sketch which read and forwarded it along as a single digit integer that the Arduino code could recognize, presenting it into a defined set of tones and frequencies within the Arduino; upon clicking on the keys, a specific sound unique to that key, would be played through the Arduino speaker.
HTML code used to create the webpage and the piano key containers:
<!DOCTYPE html>
<html>
<head>
<meta name="viewport" content="width=device-width, initial-scale=1">
<link rel="stylesheet" href="style.css" />
</head>
<body>
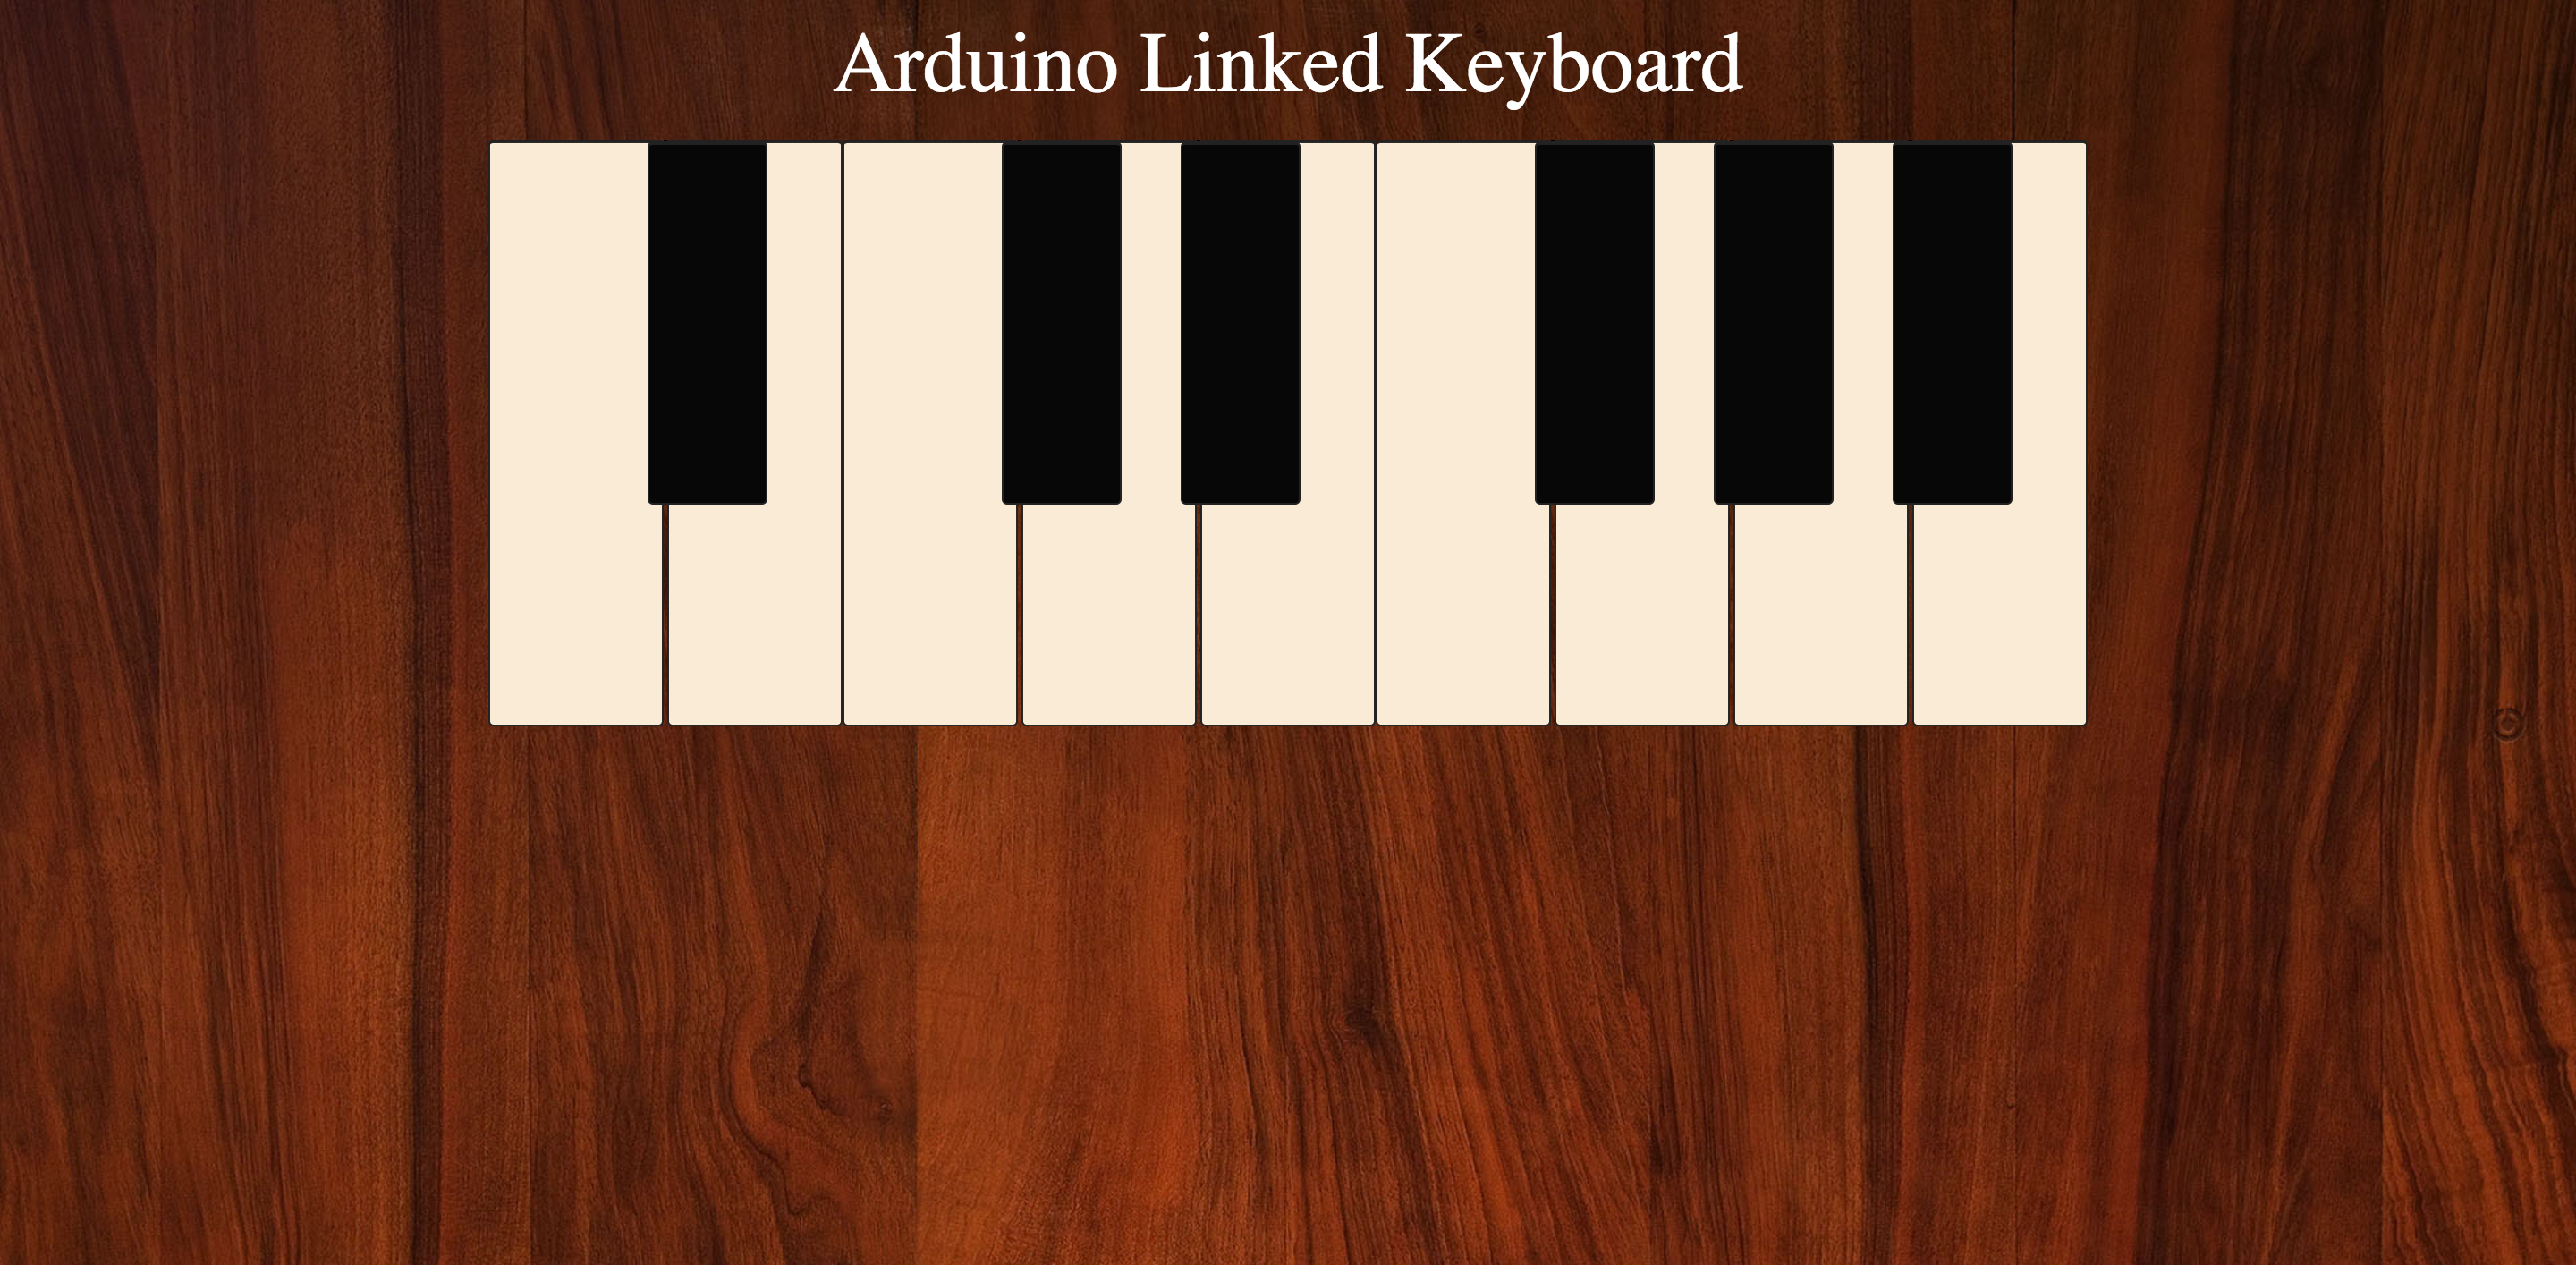
<Header class="pageTitle">
Arduino Linked Keyboard
</Header>
<div class="piano">
<div class="piano-container">
<div class="piano-keys">
<div class="piano-white 1"></div>
<div class="piano-black">
<div class="piano-black-raised b1"></div>
</div>
<div class="piano-white 2"></div>
<div class="piano-white 3"></div>
<div class="piano-black">
<div class="piano-black-raised b2"></div>
</div>
<div class="piano-white 4"></div>
<div class="piano-black">
<div class="piano-black-raised b3"></div>
</div>
<div class="piano-white 5"></div>
<div class="piano-white 6"></div>
<div class="piano-black">
<div class="piano-black-raised b4"></div>
</div>
<div class="piano-white 7"></div>
<div class="piano-black">
<div class="piano-black-raised b5"></div>
</div>
<div class="piano-white 8"></div>
<div class="piano-black">
<div class="piano-black-raised b6"></div>
</div>
<div class="piano-white 9"></div>
</div><!-- piano-keys END -->
</div><!-- piano-container END -->
</div><!-- piano -->
<script src="https://code.jquery.com/jquery-1.11.3.min.js"></script>
<script src="script.js"></script>
</body>
</html>
CSS code used to style webpage and the piano key containers:
body {
  background: url(img/wood-background.jpg);
  background-size: cover;
  /* first image is 300x100, second image covers the whole area */
}

header {
  font-size: 300%;
  text-align: center;
  color: white;
}

.piano-javascript {
  border: 3px solid #f88;
  display: block;
}

.piano {
  padding: 5px;
  margin: 0 auto;
  width: 960px;
}

.piano-container, .piano-javascript {
  border-radius: 5px;
  margin: 5px;
  padding: 5px;
}

.piano-container {
  text-align: center;
}

.piano-keys{
  word-spacing: 0;
  letter-spacing: 0;
  font-size: 0;
}

.piano-pedal {
  margin: 10px;
  color: rgba(0, 0, 0, 0.1);
}

.piano-sustain {
  color: black;
}

.piano-white, .piano-black {
  display: inline-block;
  position: relative;
  vertical-align: top;
  direction: ltr;
  margin: 0;
  padding: 0;
  border: .25px solid;
  border-color: black;
}

.piano-white:hover {
  background-color: #FFFBF5;
}

.piano-black-raised:hover {
  background-color: #161616;
}

.piano-white:active {
  background-color: white;
  transform: translateY(4px);
}

.piano-black:active {
  background-color: black;
  transform: translateY(3px);
}

.piano-black-raised:active {
  background-color: #262626;
}

.piano-white, .piano-black-raised {
  border-radius: 3px;
  border-color: #222;
  border-style: solid;
  border-width: 2px 1px 1px 1px;
  cursor: pointer;
}

.piano-white {
  width: 96px;
  height: 325px;
  background-color: #faebd7;
  z-index: 1;
}

.piano-black {
  width: 0px;
  height: 100px;
  z-index: 2;
}

.piano-black-raised {
  width: 65px;
  height: 200px;
  position: relative;
  left: -10px;
  background-color: #070707;
}
Javascript code used to create the mouse functions:
var keyVal = ['1', '2', '3', '4', '5', '6', '7', '8', '9'];


$.each(keyVal, function(i, c) {
    $('.' + c).mousedown(function(){
        js2php(c);
    });
});

$.each(keyVal, function(i, c) {
    $('.' + c).mouseup(function(){
        js2php(0);
    });
});


function js2php(qData) {
  var xmlhttp = new XMLHttpRequest();
  xmlhttp.open("GET", "main.php?q=" + qData, true);
  xmlhttp.send();
}
//write Jquery function for clicking down and holding
PHP code that sends the JS function called to a text file:
<?php
$q = $_REQUEST["q"];

if ($q !== "") {
    $dataFileObj = fopen("style/piano.txt", "w") or die("Unable to open file");
    fwrite($dataFileObj, $q);
    fclose($dataFileObj);
  }
?>
Processing code that converts text file number to integer and passes to Arduino:
/* Processing Sketch */
import processing.serial.*;
Serial ComPort;
String input[];
int last = 0;

void setup() {
  String portName = Serial.list()[3];
  ComPort = new Serial(this, portName, 9600);
  println(ComPort);
  ComPort.bufferUntil('\n');
}

void draw() {
  input = loadStrings("http://localhost:8888/arduino-piano/style/piano.txt");
  String s_current = input[0];
  int current = Integer.parseInt(s_current);
  if (current != last) {
    println("current: " + current);
    println("last: " + last);
    println("- - -");
    ComPort.write(current);
    last = current;
  }
  input = null;
  delay(50);
}
Arduino code that takes integer and plays as defined tone frequency:
int keyVal;

void setup() {
  Serial.begin(9600);
  pinMode(8, OUTPUT);
}

void loop() {
  // read the sensor:
  if (Serial.available() > 0) {
     keyVal = Serial.read();

  if (keyVal == 1) {
      // play the first frequency in the array on pin 8
      tone(8, 262);
    } else if (keyVal == 2) {
      // play the second frequency in the array on pin 8
      tone(8, 344);
    } else if (keyVal == 3) {
      // play the third frequency in the array on pin 8
      tone(8, 426);
    } else if (keyVal == 4) {
      // play the fourth frequency in the array on pin 8
      tone(8, 508);
    } else if (keyVal == 5) {
      // play the second frequency in the array on pin 8
      tone(8, 590);
    } else if (keyVal == 6) {
      // play the third frequency in the array on pin 8
      tone(8, 672);
    } else if (keyVal == 7) {
      // play the fourth frequency in the array on pin 8
      tone(8, 754);
    } else if (keyVal == 8) {
      // play the third frequency in the array on pin 8
      tone(8, 836);
    } else if (keyVal == 9) {
      // play the fourth frequency in the array on pin 8
      tone(8, 918);
    } else {
      // if the value is out of range, play no tone
      noTone(8);
     }
  }
}
The Solution
As you can see from the image at the top of this case study, the created webpage has only 15 piano keys in total; this is not the full range of keys on a standard piano, but there are enough to demonstrate how this project would work. Further more, only the nine white keys are functional. I will explain why in the results section.
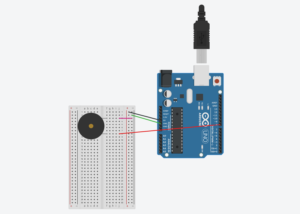
Wiring the Arduino it seemed was the easiest task as it was wired like the above mentioned starter kit example, save for the buttons and their corresponding wires. Below you till find the diagram of the Arduino board and how it was wired to meet my requirements.
Conclusion
Based off my own goals for the is project, the project was relatively successful. It did struggle quite a bit in the final stages of the project. It came down to several factors, chief among them was my vague understanding of how the different codes works when converting from one format to the other, i.e. from JavaScript to the text file, to the Processing sketch and on to the Arduino.
After working the issue for several days, the closest I came was making the speaker produce a tone when a button was clicked on the webpage. However, the tone would stay on and not change frequency when other keys were pressed. In the end it turned out that there was an issue with the Arduino being able to recognize a two digit string; it only seem to accept integers.
In oder to fix the issues I was having, I had to remove any instances of numeric strings and pass them to the tone frequencies as single digit integers. Because of the this I could only have so many functioning keys on the keyboard, which was why only the nine white keys work.
Probably the biggest lesson I have learned from this whole experience, is how important it is for the code to be perfect, especially when pushing it through several programs, all with unique requirements. If I had to do this all over again, I would probably spend even more time reading up on the tutorials offered through the Arduino website. I also believe learning more about Processing sketches and Arduino code would be of great help as well as that seemed to be where the biggest disconnect occurred.